

If you ever hunt overseas, you will undoubtedly encounter DIY shooting sticks. In places where there are few trees or rocks to brace a rifle on, like parts of Africa, a tripod shooting stick is standard issue. Simple, cheap, and effective, shooting sticks allow a foot-bound hunter to brace themselves for a shot just about anywhere. And while these tools have been eclipsed by more modern tripods in the U.S., I’d argue they are more versatile and easier to pack around.
With practice, a rifle shooter can quickly pick off targets around 300 yards away with a set of sticks. When not in use, your shooting sticks make a perfect walking stick. Best of all, they are far lighter, less complicated, and cheaper than modern tripods or anything you can find at a sporting goods store. Here’s how to make your own shooting sticks for less than $50.
DIY Shooting Stick Materials
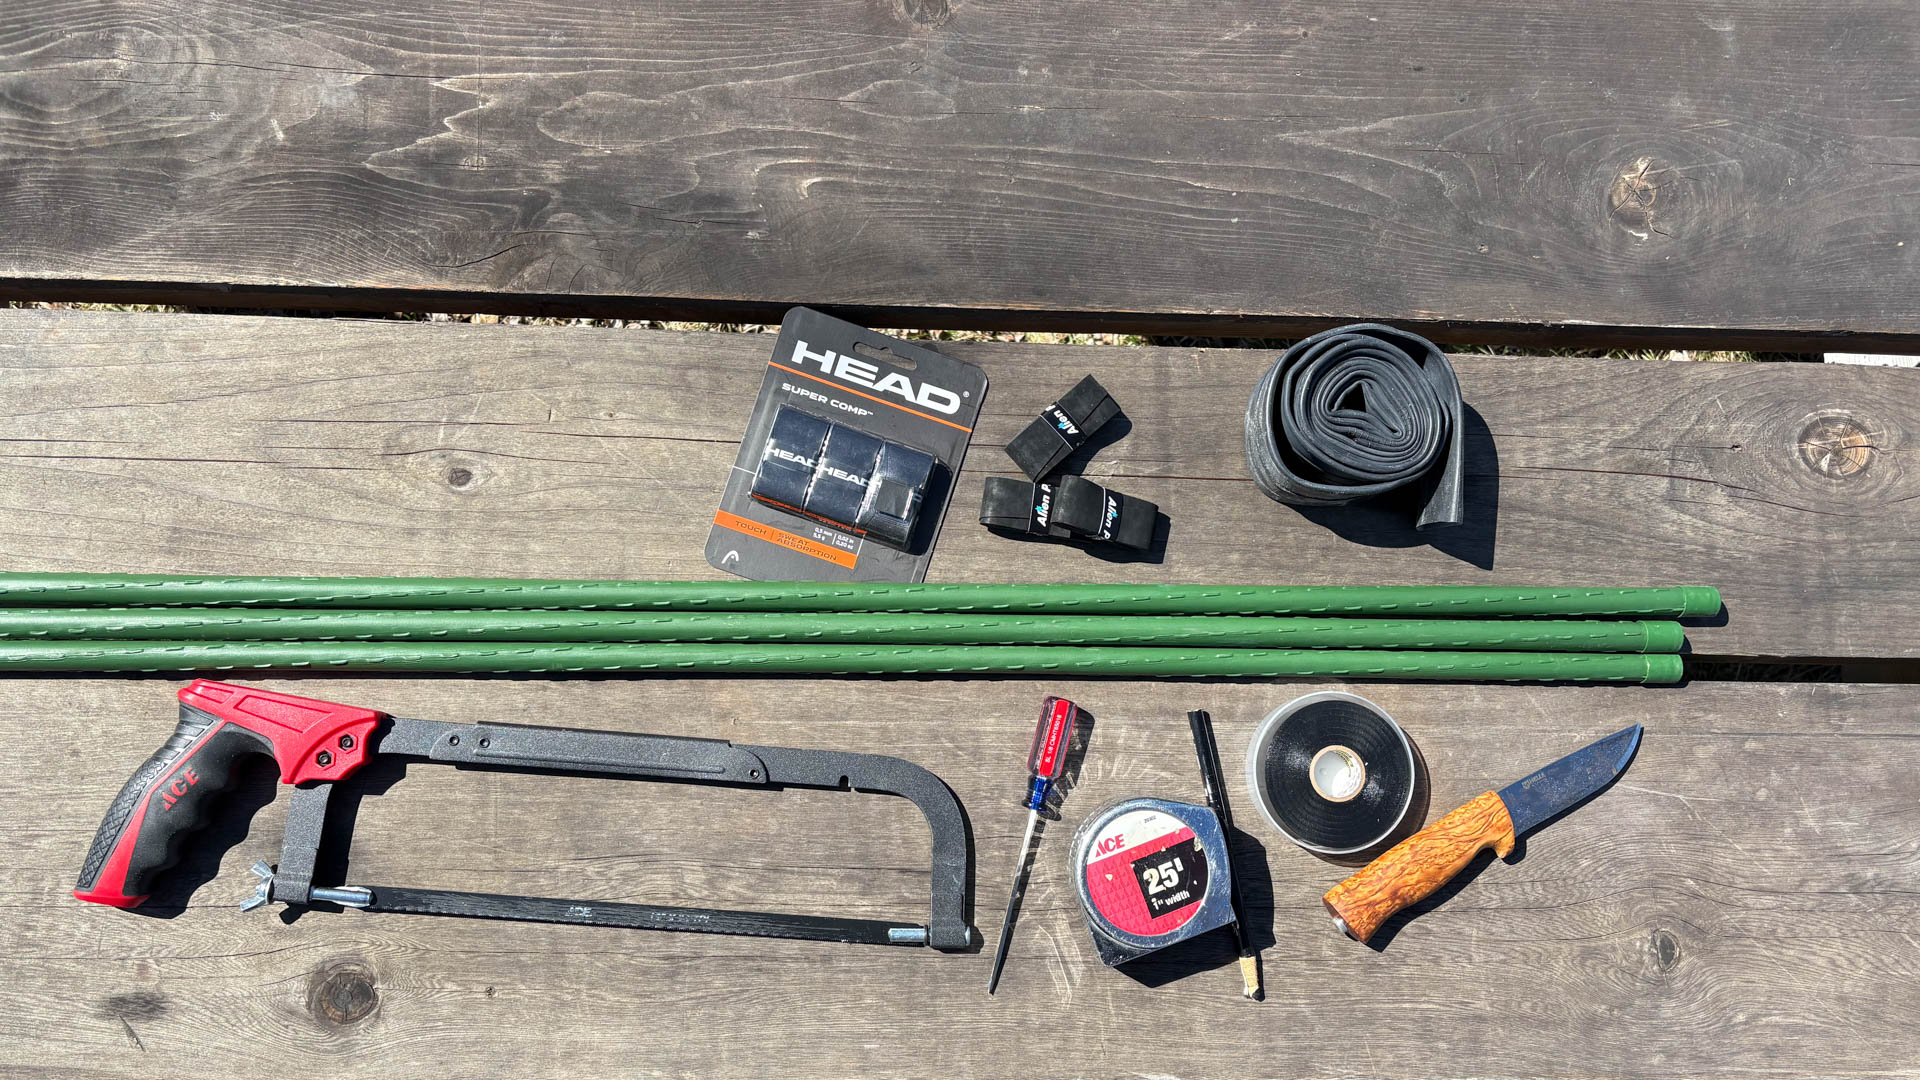
Supplies
- Three 72” x 0.6” steel-core plastic garden stakes
- One 1.75” x 2.3” mountain bike tire inner tube
- 6 rolls of tennis racket grip tape (you want a grippy, spongy feel)
- Roll of electrical tape
- Spray paint (optional)
Tools
- Hacksaw
- Scissors
In my opinion, aluminum garden stakes make the best shooting sticks. You can find them at most hardware stores. They are lightweight, sturdy, and affordable. They are also coated in plastic, which makes them quieter than bare metal tubing and more impervious to the elements than wooden shooting sticks.
For this project, I went to my local Ace Hardware and bought three 72” x 0.6" long stakes. They make these kinds of stakes in several thicknesses, and I find the 0.6-inch to be the ideal blend of sturdy and not too thick.
For the rest of the materials, I shopped online and rummaged around the house, but you could easily find the inner tube at a bicycle shop and the tennis racket grip tape at a sporting goods store.
Assembling Your Shooting Sticks
Step 1: Cut the Stakes
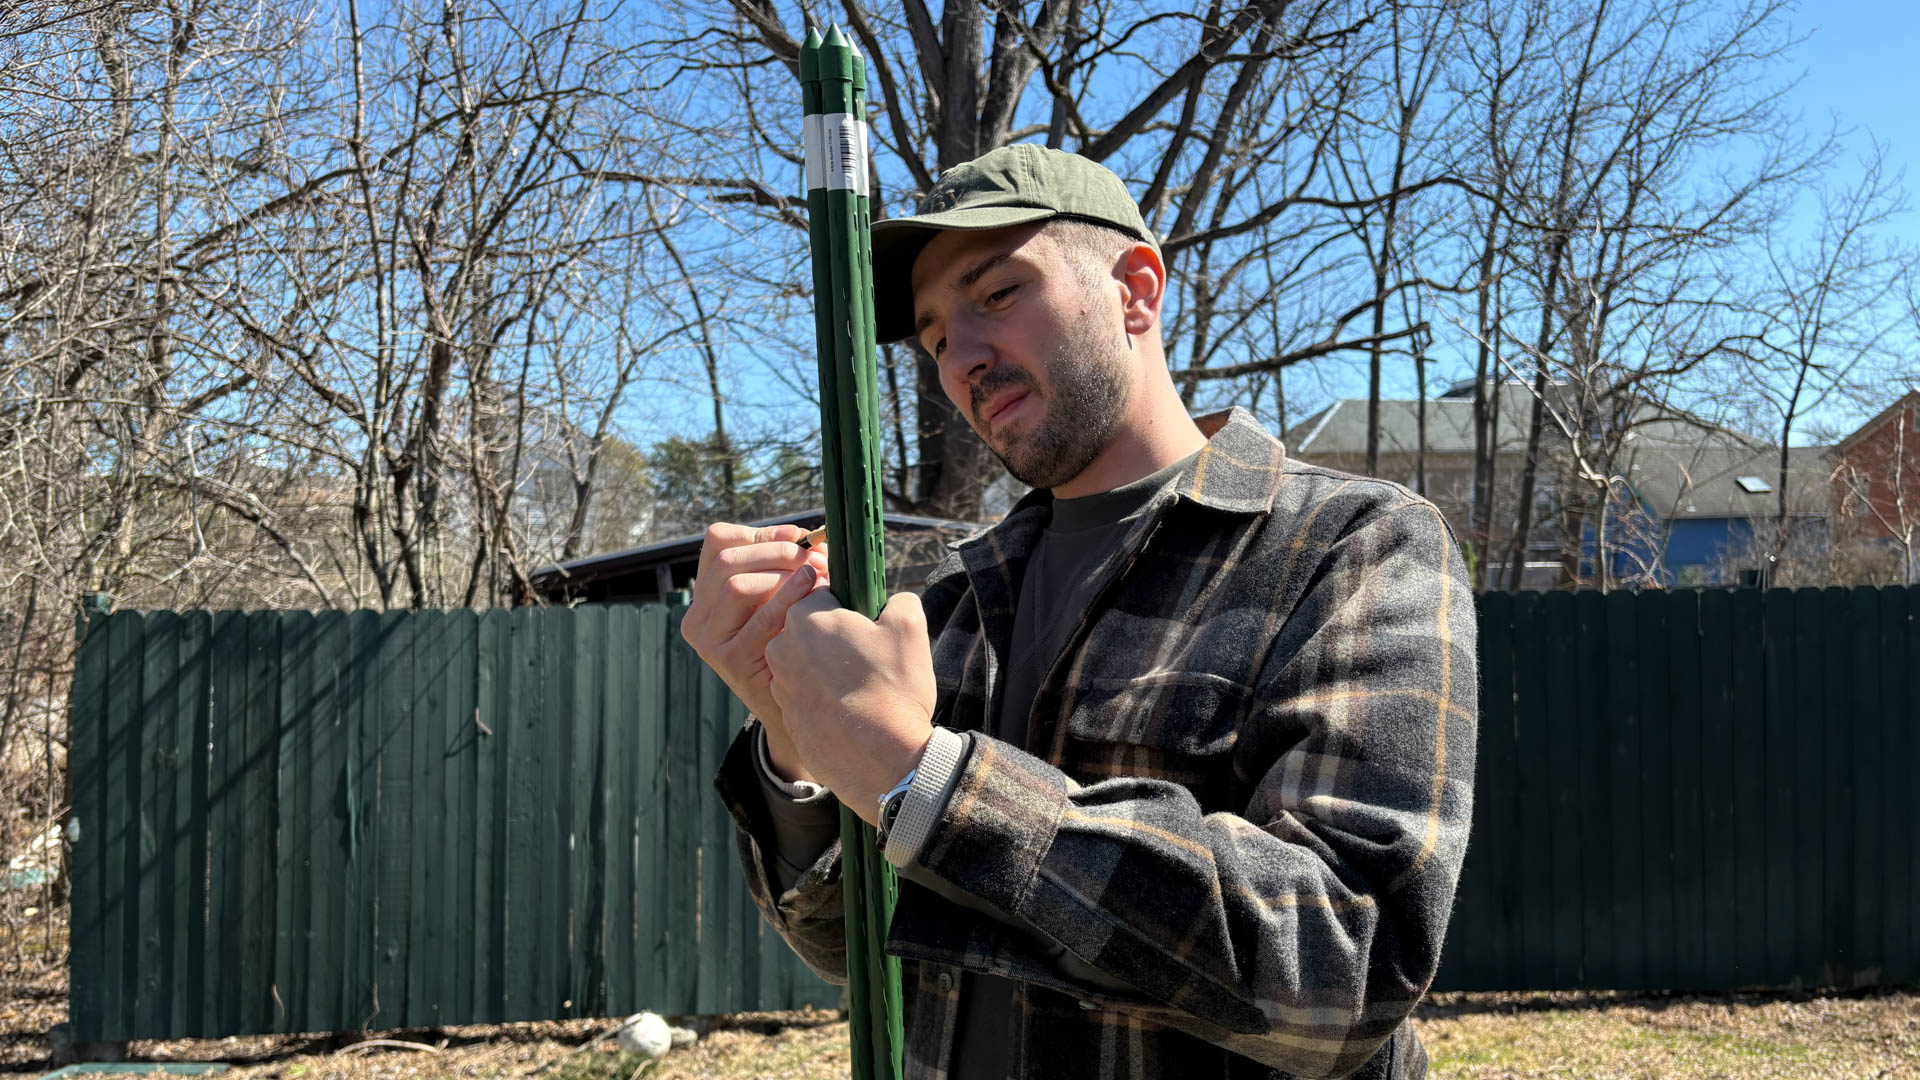
First, figure out what height you want your sticks. I like mine about chin height because I can use them in a standing, kneeling, or seated position. However, if you hunt brushy terrain and plan to only shoot from a standing position with the sticks, I suggest cutting all three to be about head height. Turkey hunters and those who hunt from a ground blind might want to make a set of short sticks to be used only in a seated position or kneeling. For this, I suggest going about waist-high.
Mark the first stake to your desired height from the bottom, pointy end of the stake, then measure and mark the others. Cut all three with the hacksaw, leaving the covered top end of the stake, then cut one of them five inches shorter. You should be left with two long sticks and one slightly shorter, each with the top plastic caps still in place.
The bottoms of the stakes will not be finished off because the bare metal/plastic edge grips the ground better than anything I’ve tried. If you’d like to paint the stakes camouflage or any other color, now would be the best time to do that, though I usually just leave mine the way they are.

Step 2: Wrap the Stakes
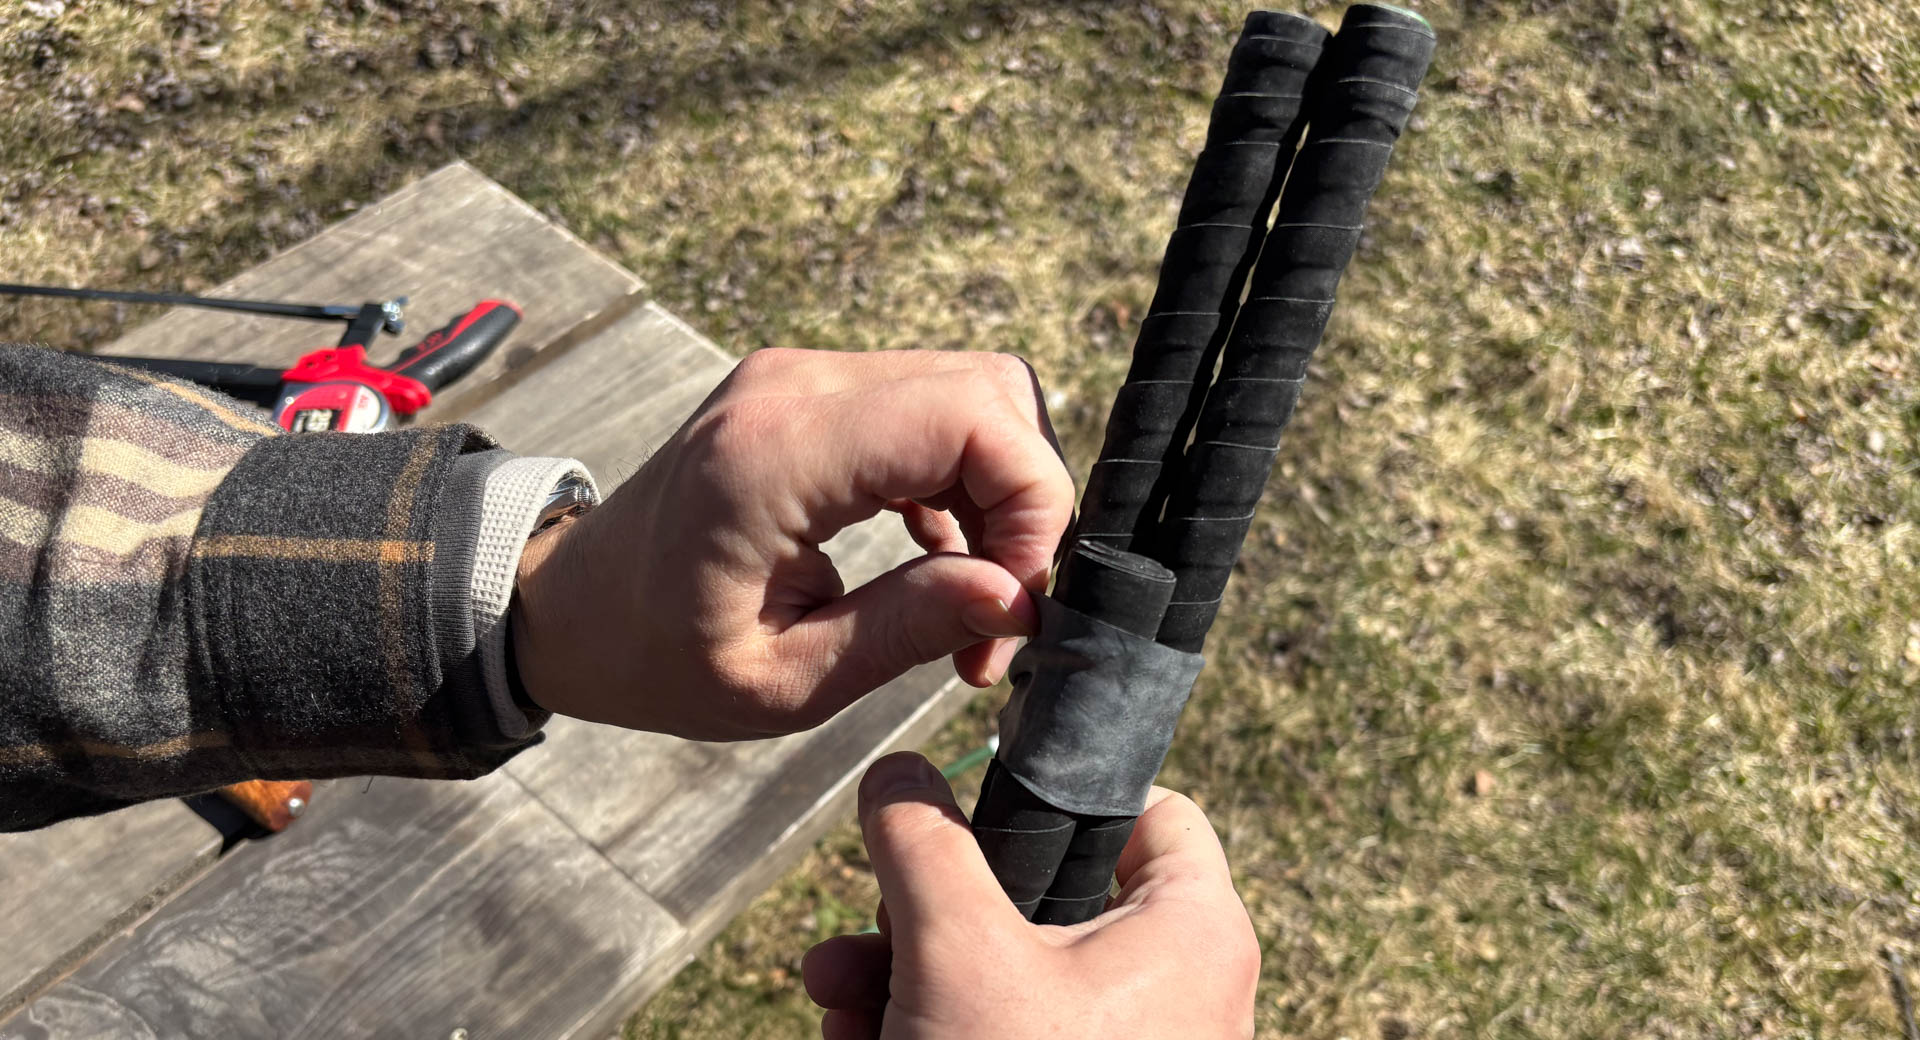
There are two ways to wrap the stakes. If you’re using big rolls of tennis racket tape, you can wrap the whole thing, saving about 10 inches at the bottom. This will give you a grippy surface over the entire shooting stick. The tennis racket tape I use comes in smaller rolls designed for one racket grip. I like to wrap the three stakes at the top to grip the rifle and at the midpoint to keep the stakes from banging together and making noise.
Starting with the shorter stake. Give a few wraps with the tennis racket tape to form a knob on the top end. Make another wrap, only one layer thick and about two inches long, then form another bulge or knob in the wrap below that by stacking the tape up more and more. Once that bulge is about as thick as the first one, continue wrapping either down the entire stake or until your tennis racket tape roll is finished. Finish the end off with electrical tape.
For the other two, longer stakes, don’t form a knob at the top. Just wrap from the top down about 10 to 12 inches (or cover the entire stake), then finish off the bottom ends with electrical tape. If you’re using short rolls of tape, wrap each stake around the middle, and finish off with electrical tape at each end to keep them from unraveling.
Step 3: Put it All Together
Roll out the bicycle tire inner tubing and cut a two-inch piece with a pair of scissors. On the tubing I use, the inside feels almost powdered, and the outside is more tacky rubber. If you have tubing like this, turn it inside out so the tacky side is on the inside.
Gather the stakes and stack them so the bottoms are all even, then stretch the section of inner tube around all three. Work it down so it rests between the two knobs on the shorter stake and stays put. You now have a set of shooting sticks.
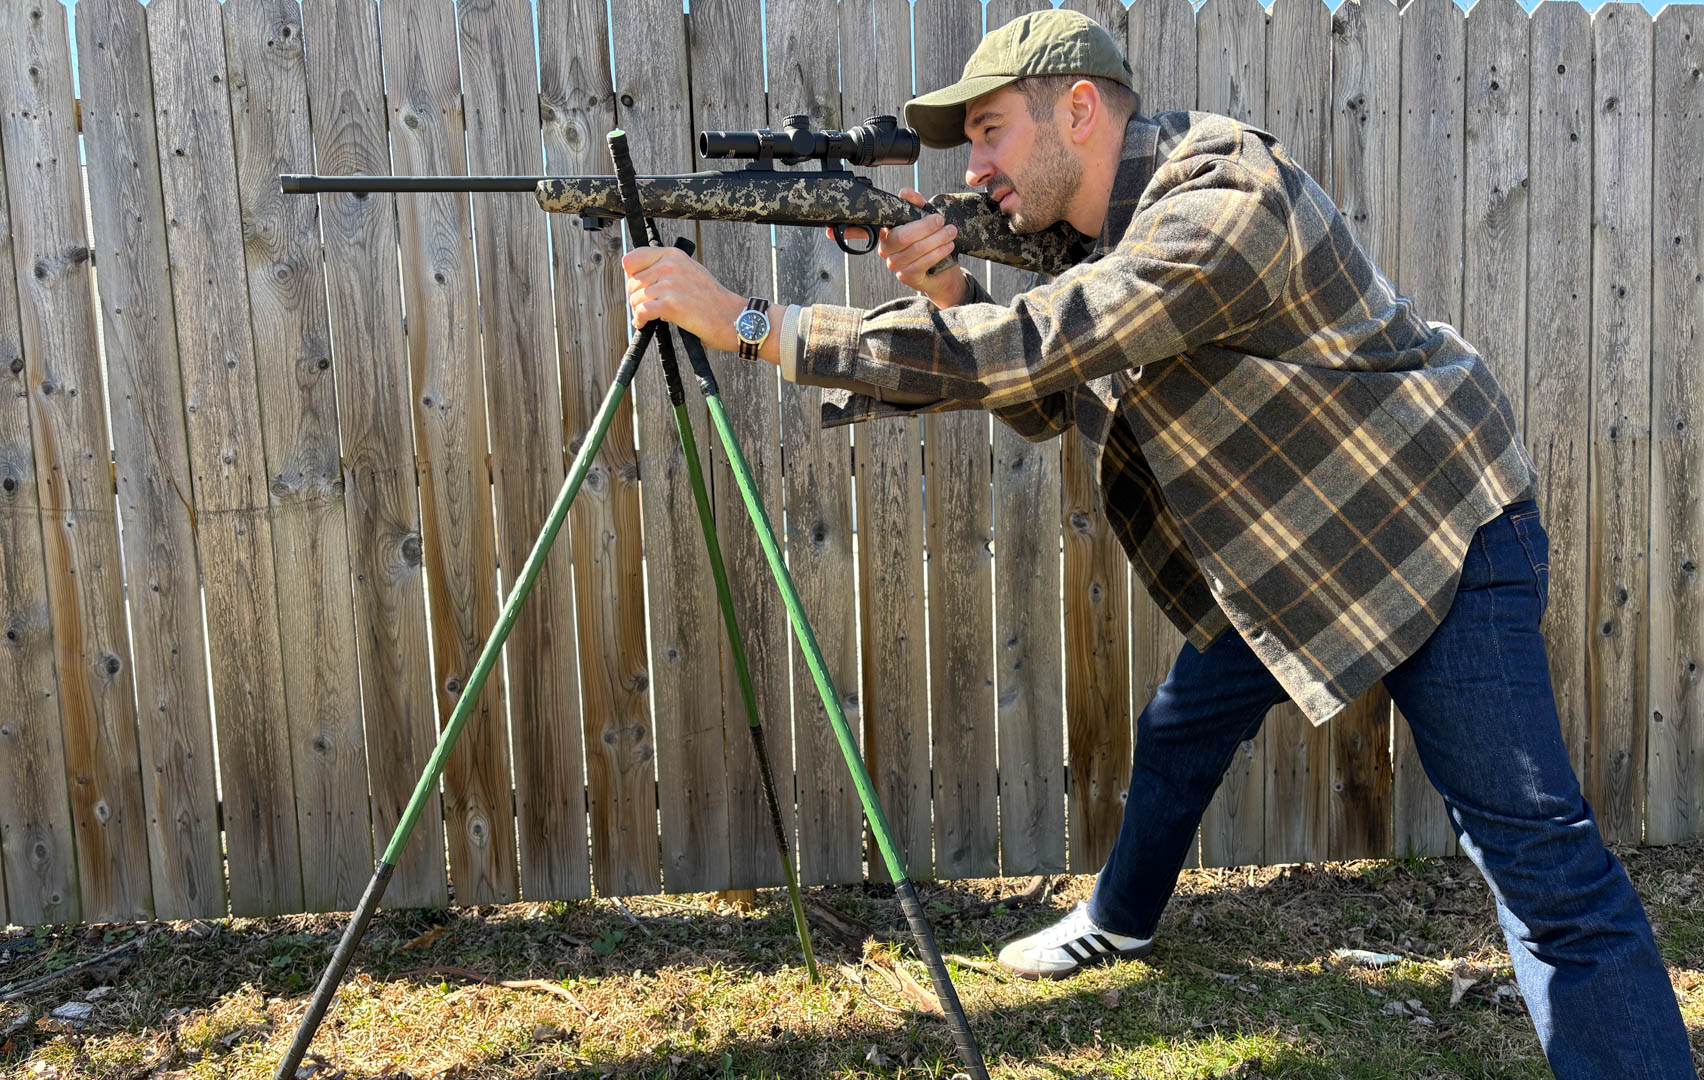
Using the Sticks From a Standing Position
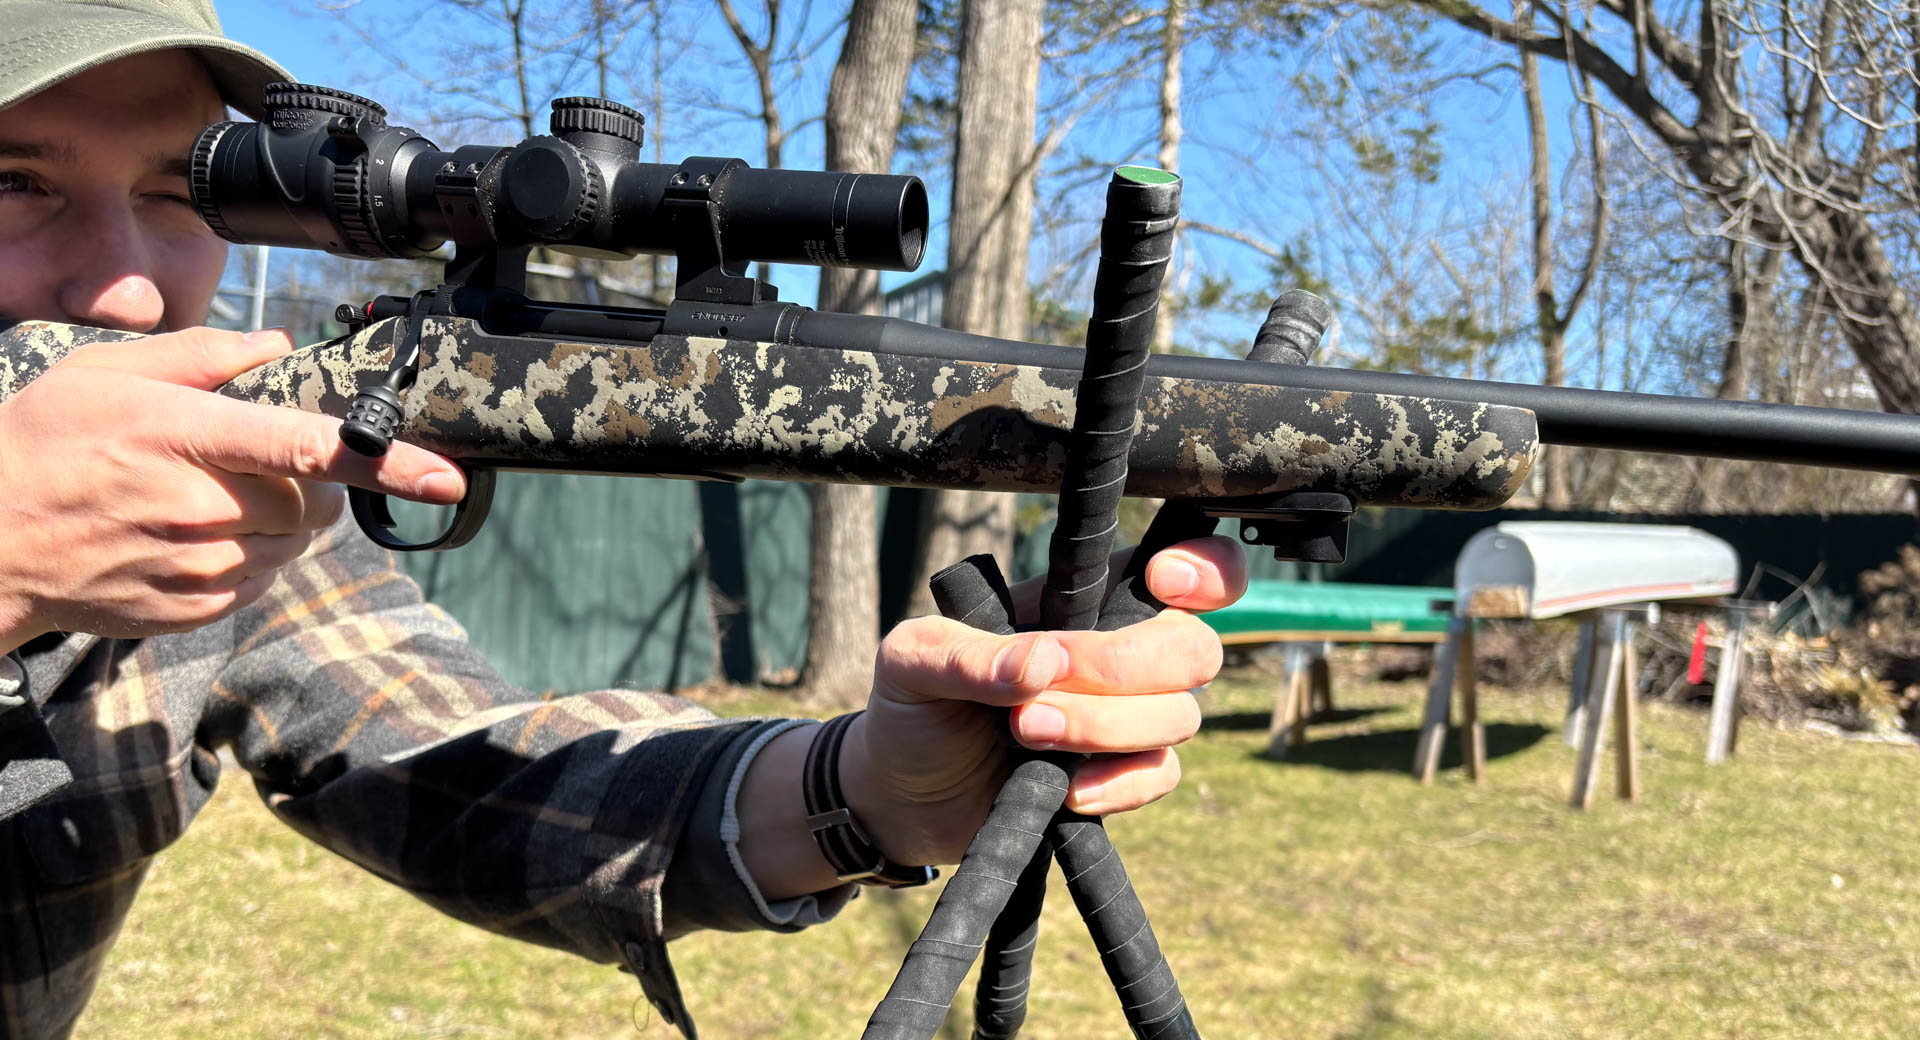
Open the sticks into a tripod with the shorter stake pushed forward and the longer stakes crossing and extending to your right and left. This will give you a fork just below shoulder height. Rest your rifle or shotgun forend—not the barrel—in the fork, then shoulder the rifle and grip the stakes right where the forend meets the bottom of the fork. I like to hold a bit of the forend and the stakes at the same time.
Most of the steadiness when shooting from sticks comes down to body position and footwork. You want to square up to the rifle instead of blading off from it. Your shoulders should be perpendicular to the rifle on target, instead of having one shoulder in front of the other, and the same goes for your feet. Try to place the buttstock as close to the center of your body as possible, bring the comb to your cheek, and raise and lower your body by spreading and locking your legs to shoot higher or lower. You can get even steadier if you use the rifle sling to cinch your off-hand arm just below the elbow. If you need to raise or lower the rifle, adjust with the sticks, spreading them more or less.
More Uses for Shooting Sticks
The reason I cut my sticks a little on the short side, compared to ones you’ll see in Africa, is that I like to use them for different things. I typically don’t like to shoot from a standing position if I can avoid it. It’s always more steady to shoot from a reverse kneeling or seated position. By spreading the legs of the sticks wider, I can bring mine down for either position. Using the reverse kneeling, I can steady the forend of the rifle with the sticks and my off-hand elbow with my knee. This gives me a lot of support, and it’s a position I can get into much more quickly than a prone position.
You can also spread the sticks and shoot from a kneeling or seated position by bracing your rifle on just one of the legs. It can often be just enough support to make a shot that would have otherwise been very unsteady. For an even faster shot, you can use the three sticks gripped together as a monopod. For this shot, I usually place my rifle’s forend on the top end of the shorter stake and grip everything together with my support hand, much like you would do when bracing a rifle against a sapling.
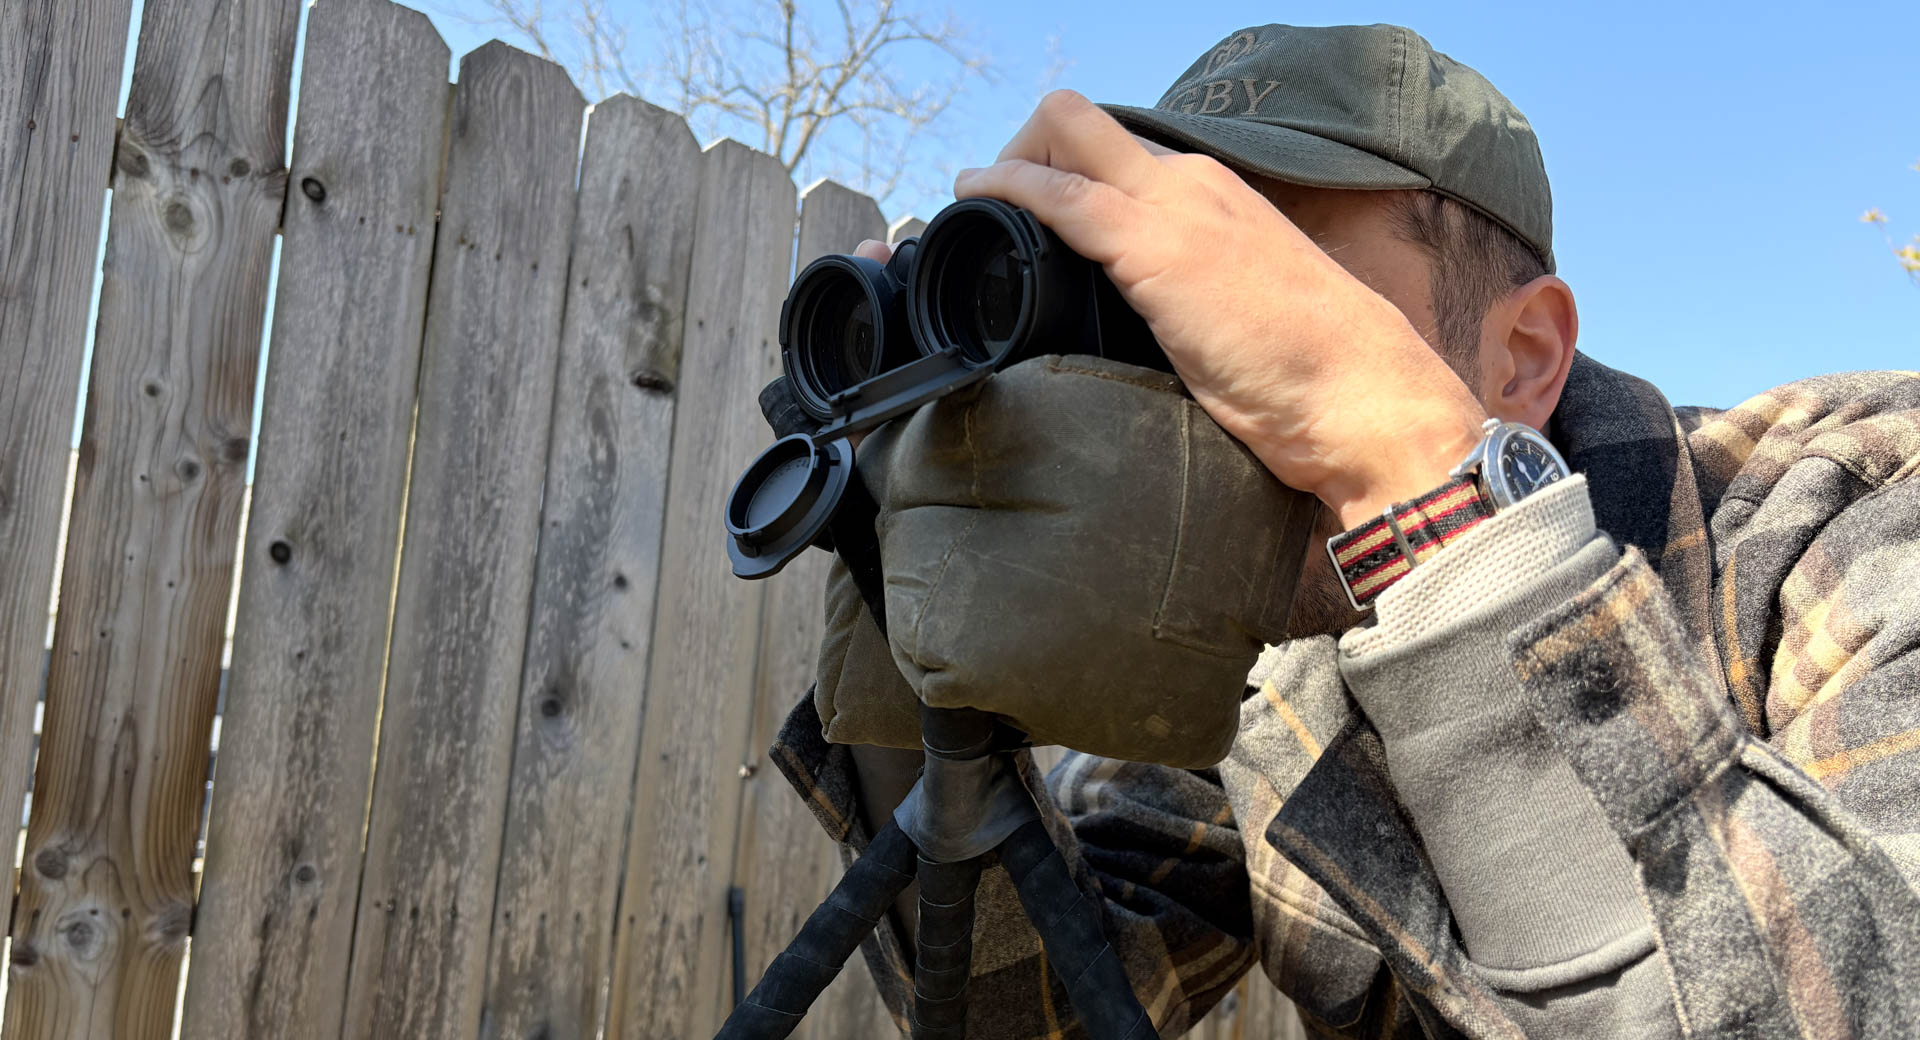
One of my favorite uses for shooting sticks is glassing. A lightweight rear shooting bag, like a Pint-Sized Game Changer from Armaggedon Gear, balances between the forks of the sticks perfectly. From there, you can rest a binocular and glass while sitting, kneeling, or standing. This will steady your binocular almost as much as a tripod for a fraction of the weight and about 1/10th of the cost.
Shop

Sign In or Create a Free Account
Related

Gear
How to Make DIY Shooting Sticks

Cooking Techniques
How to Make Caviar


Conversation